

Description
How do I store the Golden Teacher Magic mushrooms grow kit XL GetMagic?
Do not store your grow kit longer than 2-3 weeks
We recommend starting your mushroom grow kit right away and begin the growing process. If you decide to grow later, do not store your grow kit longer than 2-3 weeks after the production date.
Store in a cool place
Always store the mushroom grow kit in the refrigerator (2°C to 4°C). The production date is printed on the cardboard box and includes the two digits of the week number.
Avoid contamination
Make sure your fridge is clean and free of bacteria, yeasts and other sources of contamination. To be safe, pack the culture kit in a clean plastic bag and seal it tightly.
Instructions
- 1
 Wash your hands thoroughly and clean the outside of the growkit with a dry cloth. Remove the lid and save it for step 2
 - 2
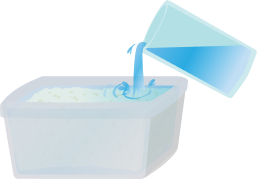 Fill the growkit to the edge with lukewarm water (20°C), put the lid back on the growkit and let it soak for 5 minutes.
Important: never soak the growkit for more than 1 hour!
- 3
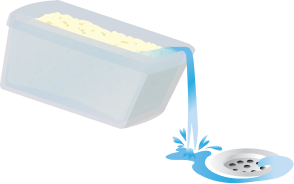 Remove the lid from the growkit and drain the water well. Let the growkit drain for 10 seconds.
 - 4
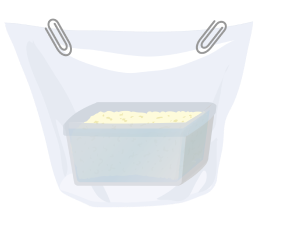 Place the growkit in the growbag and fill the growbag with a cup (200-250ml) of lukewarm water (20°C). Then fold the top of the bag and close it with 2 paperclips.
 - 5
 Place the growkit in a place with 20-25°C average room temperature. Make sure that the growkit is not in direct sunlight, not under a lamp and not near a radiator/heat source.
Important: the bag must remain closed until the first pinheads form. Until then the CO2 content and humidity inside the bag should be as high as possible. - 6
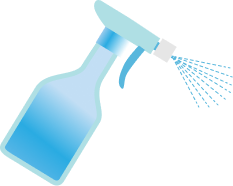 When the first pinheads* are visible, let some fresh air into the growbag on a daily basis (for a few minutes) and then moisten the growkit with a misting bottle.
*Pinheads are the first visible forms of tiny mushroom caps. It can take 10 to 20 days for the first pinheads to be visible. - 7
 The mushrooms can be harvested just before the membranes on the bottom of the cap open up. While harvesting gently grasp the stem and turn it left/right. When the mushroom becomes loose, pull it out as carefully as possible.
Important: the mushroom must be completely removed so that there is room for a new one. - 8
 Congratulations, the harvest is complete. It is now possible to grow a new flush of mushrooms by repeating steps 1 to 7 again.
Read the following do’s and dont’s for a successful grow.
Despite the fact that mushroom grow kits are simple to use and relatively foolproof, we have summarized the most significant elements for you. Temperature, light, humidity, the first mushrooms, and the development cycle are only a few examples.
The optimal temperature for mushroom development is 24°C. The temperature should not go below 20°C and should not rise over 29°C. You may use a Thermo Heatingmat to prevent the temperature from going below 20°C. In the winter or colder places of the globe, a thermo mat is a must-have.
Light
The mycelium in the magic mushroom kit simply requires light to ‘understand’ that it has reached the surface. Only then will mushrooms sprout. A few hours of fluorescent/artificial light or indirect sunshine each day is sufficient. Because direct sunlight destroys mycelium, keep the sun away from the grow kit.
Humidity
Misting begins the day the first pins appear. Remove the paperclip from the grow bag to open it. Spray once against each edge of the bag rather than immediately on the cake. So you mist four times a day. Misting also allows new oxygen to enter the bag. Close the bag with the paperclip immediately after misting.
FAE stands for frequent air exchange.
Keep the grow bag tight until the first pins appear; CO2 levels should be as high as possible to stimulate pinning. After the pinning step, you may open the bag 1-2 times each day to allow fresh air to enter. Open and seal the bag, pushing out the air and letting in some fresh air.
The very first shrooms!
If the growing circumstances are ideal, the first little mushrooms (the pins) should develop between 10 and 20 days. This is also determined by the strain. Some cubensis strains mature at a slower rate than others. It may take another week to attain maturity. A whole growth cycle might last up to 4-5 weeks.
Flushes
The mushrooms appear in clusters. A flush is a kind of growth like this. A kit may provide more than one flush. The first two flushes are the most significant. More flushes will follow, each one smaller than the last.
Picking and Harvesting
Pick mushrooms when the veil between the hat and the stem is going to or has just torn. If you wait much longer, the mushrooms will shed their spores. Pick just the ripe mushrooms and let the rest to develop. The alternative is to remove all of the mushrooms and begin a fresh flush.
How to pick your mushrooms:
- Use surgical gloves or disinfect your hands, wrists and arms.
- Remove the mushrooms from the cake by taking hold of the base of the mushroom between thumb and index finger.
- Rotating your hand clockwise slowly, until the mushroom lets go.
Do not pull out the mushrooms. This would risk damaging the mycelium and killing it. When most of the larger mushrooms have been picked, also pick the smaller ones and the pins as well.
Mushrooms that grow from the sides
Mushrooms grow where the light reaches and where there is little penetrating resistance. Because the cake has light shining on the sides, the mushrooms might also grow there. You have a few options:
- Darken the sides of the kit by putting it in the cardboard box.
- Spray the top soil a bit to stimulate more growth on the top
- Do nothing and let them grow
Soaking
After all the mushrooms are harvested, you prepare the kit for the next flush. Disinfected your hands or use gloves; take the grow box out of the grow bag.
- Fill the container with lukewarm water (20°C)
- Take the lid use it to close the container.
- Let it soak for 5 – 20 minutes.
- Remove the lid, and drain the water
- Place the growkit in the growbag and fill the growbag with a cup (200-250ml) of lukewarm water (20°C)
This is known as the soaking process. Water will now be absorbed by the cake, preparing it for the next flush.
You may hang the grow bag with micronfilter upside down to dry while it is soaking. After each flush, many growers like to utilize fresh and unused grow bags.
Following that, flush
To proceed, repeat steps 2 through 7 as you did when you originally began the procedure. A fresh flush will occur a few days later. A grow kit can provide at least two flushes. The initial flush is often the largest.
The Conclusion
After the second flush, if no additional mushrooms grow out of your grow kit for at least 5-6 weeks, or if the grow kit becomes green, red, grey, or yellow, the grow kit may be discarded. The color shift indicates that the grow kit has been infected with another fungus or bacterium. The mushroom grow kit will no longer produce mushrooms, and it should be discarded in the trash or in your yard.
Spores
When you pluck the mushrooms too late, they will shed their spores. Because of the spores, the cake and mushrooms will become black/purple (some other cubensis strains may turn red/brown). This isn’t a big deal; it simply doesn’t look very nice.
When mushrooms release their spores, they begin to deteriorate and the active chemicals disintegrate. Mushrooms’ potency will be reduced.
Golden Teacher Strain information
Some think that a specimen of the Golden Teacher mushroom was discovered growing in the wild in Florida, USA, in the 1980s. The word spread quickly, owing to the distinctive golden hats with yellow speckles. The Golden Teacher magic mushrooms are particularly huge and exquisite in appearance when compared to other Psilocybe Cubensis mushroom species.
According to legend, the Golden Teacher was renamed by a Dutch grower because “sometimes right before the veils break when the primordia are at their largest size before becoming mature, the entire shroom can have a golden yellowish color which vanishes when maturity starts to set in.” Source: fanaticus.com, which is temporarily unavailable.
Origin: Unknown, possibly USA
Cap: 20-50 mm, Brow to Golden (yellow) brown when the mushroom matures,
Stem: 40 -125 mm, medium ot large in size, bruises green blue when touched
Spores: Dark purple brown, 11.5–17 x 8–11 µm, subellipsoid, basidia 4-spored
Substrate: PF Tek and BRF, Rye grain, Straw and Dung
Be sensible
Check out the responsible use page for more information on do’s and don’ts.


Reviews
There are no reviews yet.